


Attention: The treading units always follow this same sequence 1, X, 2, X and do not reverse when the block direction reverses.
The way you assemble these pattern blocks will create your design.
Often the pattern draft is not written out with all shafts, but it’s shortened in something called a “profile draft”.
In a profile draft, design blocks are represented by a single square. This abstracts the design, it’s shorter to write out and permits furthermore to translate several different weave structures into a possible block design.
Below the profile draft of the threading scheme above:

4 Tie-up
Though “Summer and Winter” stand out for his economic use of shafts, you can’t really say the same for his treadles consommtion.
Each block needs in fact two treadles: one lifts shaft 1 plus all of the block pattern shafts, and the other lifts shaft 2 plus the same pattern shafts.
This means for 2 blocks you need 4 treadles + 2 treadles for the tabby = 6 treadles.
For 6 blocks you would need 14 treadles!! Impossible for most of us.
The usual solution to avoid this “treadle inflation” is to use a skeleton tie-up.
A skeleton tie-up can mean two things:
- You can tie up each pattern shaft to its own treadle. On a 4 shaft loom no problem, but on an 8 shaft loom, this means you will need perhaps to push down 5 treadles at the same time…
- Another way: You can separate the tie-downs treadles from the pattern treadles
Below an example. The original tie-up for this 8 shaft pattern would need 12 treadles. By separating the tie-down shafts from the pattern shafts you can do it with 8 treadles! You need only to treadle the desired pattern shafts plus the appropriate tie-down shaft at once.

5 Treadling
Basically the treadling follows the rule =
One pattern pick – one tabby pick
But to create a block you need in fact always at least 8 picks, see the scheme below:
8-pick sequence of four pattern shots each followed by a tabby shoot, with tabbies used alternately.
Pick 1: Pattern: Tie-down + Patternshaft
Pick 2: Tabby: shafts 1,2
Pick 3: Pattern: Tie-down + Patternshaft
Pick 4: Tabby: shafts 3,4,…
Pick 5: Pattern: Tie-down + Patternshaft
Pick 6: Tabby: shafts 1,2
Pick 7: Pattern: Tie-down shaft + Patternshaft
Pick 8: Tabby: 3,4,….
1.Tabby – 2. Tie-down shaft + 3. pattern shaft ( 2+3= pattern)
A three-component process and especially the fact that the pattern block is always composed of a tie-down shaft + a pattern shaft was the most difficult part in “Summer and Winter” for me to understand.
Now a short explication of these three components:
1.Tabby: The sheds for the tabby are 1,2 versus all the pattern shafts.
- In a four-shaft design that would be 1,2 versus 3,4 for example.
- In an eight shaft design 1,2 versus 3,4,5,6,7,8.
2.Tie-downs:
To weave the pattern pick, you need first to decide about the way you want to use the tie-down shafts. There are 4 different ways:
- Singles/Alternating/Bricks: 1, 2, 1, 2
- Pairs “X”: 2, 1, 1, 2
- Pairs “O”: 1, 2, 2, 1
- Dukagang/Columns: 1, 1, 1, 1 or 2, 2, 2, 2
These 4 different uses of the tie-down shafts don’t change the overall block design itself but influence the “appearance” of this design quite a lot.
I show below the same block with the same pattern shafts but treadled with different tie-down shafts:
Singles/Alternating/Bricks: lifts the tie-down alternately 1, 2, 1, 2.
Blocks are more squared off, the texture is that of small bricks:

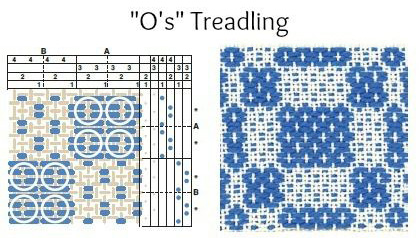
Pairs treadlings “O”: lifts the tie-down in 1,2,2,1 sequence
Edges of the blocks have a rounded shape like the letter ‘O’:
Pairs treadlings “X”: lifts the tie-down in 2, 1, 1, 2 sequence
Edges of the blocks have the shape of the letter ‘X’:

Dukagang treadling: lifts always the same tie-down shaft, either 1, 1, 1, 1 or 2, 2, 2, 2,
This causes vertical lines or columns in the pattern areas:

3. Pattern shaft:
After you’ve chosen which “style” you want to weave your “Summer and Winter” and accordingly decided in which way to use your tie-down shafts 1 and 2, you now need to add one or several pattern shafts (3-8) to your tie-down in order to weave the pattern itself. Which shafts to use depends naturally on your block design himself.
A little hint here: on a raising 4 shaft loom when you raise the shaft 3 + tie-down you’ll weave the block B (see above), when you raise the shaft 4+ tie-down you’ll weave the block A.
On an 8 shaft loom, you can naturally raise every pattern shaft separately but you can also combine these pattern shafts among each other. This increase, even more, the number of possible blocks.
But -still not enough – you can also raise no pattern shaft at all but only use the tie-down shaft, or raise all pattern shafts together with the tie-down. These two ways of treadling are called to weave “all blocks” or to weave “no blocks”. We often forget about these two, try them out and see what happens! I think you now really have enough input to explore and play around, “Summer and Winter” is really great for this.


What a great post, thanks for providing all this helpful detail. I really love the look of it especially the yellow barres, and the multicolored. I will definitely give this a go once my 8 shaft loom arrives
Thanks Sara!! That’s so kind! My favourite is the multicoloured for the moment. He’ll be part of my small collection of cushions this summer. I think he’s really special. Would love to hear of you and your explorations once you’ve received your loom, but Summer and Winter you can do on a 4 shaft loom too. Don’t know if you have one? Happy week-end
Love your explanation! More clearly than in most books.
Oh! Thanks so much!! That’s very kind!! Litlle happy dance over here!!
Je suis enchanté pour connaître votre tissues.
Il son merevaillose
Je pense fer un workshop avec toi, je ne ce pas quan c’est possible. Je vos appelais I nous parlem.
Bonne sort !!
A tôt à heure..
Perdón pour mi Française.
Merci beaucoup Maria pour ces mots gentils!! Avec plaisir pour un cours, tu me téléphones quand tu veux!
J’apprends beaucoup avec cet article mais ce serait vraiment plus facile pour moi en français. Merci beaucoup!
Bonjour Guylaine, contente que tu as quand même pu tirer quelque chose de cet article…oui, la décision d’écrire en anglais n’est pas idéale, je le sais bien… j’ai normalement un bouton de traduction sur la page, mais les articles de blog deviennent trop pour les nombres de mots pour lesquels je paye…je suis un peu “assis entre deux chaises”…
Thank you Petra for this wonderful explanation to a confusing treading! I do have a question. In the example above, why are picks 4 and 8 not shafts 1,2? Where did the 3,4 come in?
Tabby: 1.2 – against all other pattern shafts. Tabby means always for all pattern that you have to do 2 rows – one row with half of the shafts and the other row with the other half of the shafts. For Summer and Winter half of the threads are always on shaft 1+2 and the other half of the threads are on the remaining shafts. When you have a SW pattern with 4 shafts this means 1+2 against 3+4. When you have 8 shafts this would mean to do tabby you must do 1+2 against 3+4+5+6+7+8. You always have to do: first tabby row (1+2), pattern row, second tabby row (3+4+5+6+7+8), pattern row. The second tabby row depends on how many shafts you work with…
Hope this is clearer?
Thank-you for this great explanation. I am very interested in learning what pitfalls you ran into as you perfected your technique. I just finished a SW project and found I had to beat very hard to obtain the aspect ratio that I needed for the design — otherwise it became elongated. I used 8/2 tencel for the warp and tabby weft and doubled it for the pattern weft.
Best regards,
Roberta
Thanks so much for your comment Roberta. These “composed” techniques needs always a lot of sampling to find the right set! But they’re worth it, aren’t they?
I love this post. Thank you so much for sharing